



Artikel: How to Apply Mineral Sunscreen Without White Cast
How to Apply Mineral Sunscreen Without White Cast
Table of Contents
- Why Mineral Sunscreen Leaves a White Cast
- How to Apply Mineral Sunscreen: A Step-by-Step Routine
- How Much Sunscreen to Apply for Even Coverage
- Tinted Mineral Sunscreen: When a Hint of Color Helps
- Mineral Sunscreen for Dark Skin: Reducing Ashiness
- Troubleshooting Pilling, Streaks, and Coverage Gaps
- Choosing a Mineral Sunscreen With Less Visible Residue
- Frequently Asked Questions
Last Updated: October 21, 2026
Why Mineral Sunscreen Leaves a White Cast
A white cast happens when mineral UV filters sit on top of the skin and reflect light back. That chalky look is the tradeoff for mineral protection, and it is fixable.
Mineral sunscreen is a sun protection formula that uses zinc oxide or titanium dioxide to block UV rays on the skin's surface instead of absorbing them. Those particles are naturally white.
The good news: most white cast complaints trace back to technique, not the formula. Get the application right and the finish changes dramatically.
Zinc Oxide, Titanium Dioxide, and the Chalky Finish
Zinc oxide and titanium dioxide are the two filters behind nearly every physical sunscreen. Both are white powders at the source.
UCLA researchers developing a zinc oxide shape that reduces chalkiness are working on this exact problem, which tells you something important. Formulation matters, and it is evolving.
But formulation is only half the story. How you apply the product decides how much of that whiteness stays visible.
How to Apply Mineral Sunscreen: A Step-by-Step Routine
Here is the short answer: prep damp skin, dot the product in small sections, pat and blend each one, then let it settle before makeup. That sequence handles most white cast problems before they start.
Step 1: Start With Hydrated, Prepped Skin
Dry skin grabs at mineral particles and holds them in place. Hydrated skin lets the formula glide.
Apply a moisturizer first and give it a minute to absorb. A damp sponge pressed over the face afterward adds a thin layer of moisture that helps mineral formulas spread.

Skip heavy silicone primers underneath. They can cause the sunscreen to bead up and pill. If you use a serum, choose a thin, water-based one and let it dry fully before the next layer.
Step 2: Measure the Full Amount First
Most people apply far less sunscreen than they should, and under-application creates its own problems: uneven coverage reads as patchy residue rather than a smooth finish. A common working reference is roughly ¼ teaspoon for the face alone, with additional product for the neck and ears. Measure that amount into your palm before you touch your face, it is much easier to distribute a known quantity evenly than to guess.
Step 3: Dot, Then Pat and Blend in Sections
This is the step most people rush. Don't.
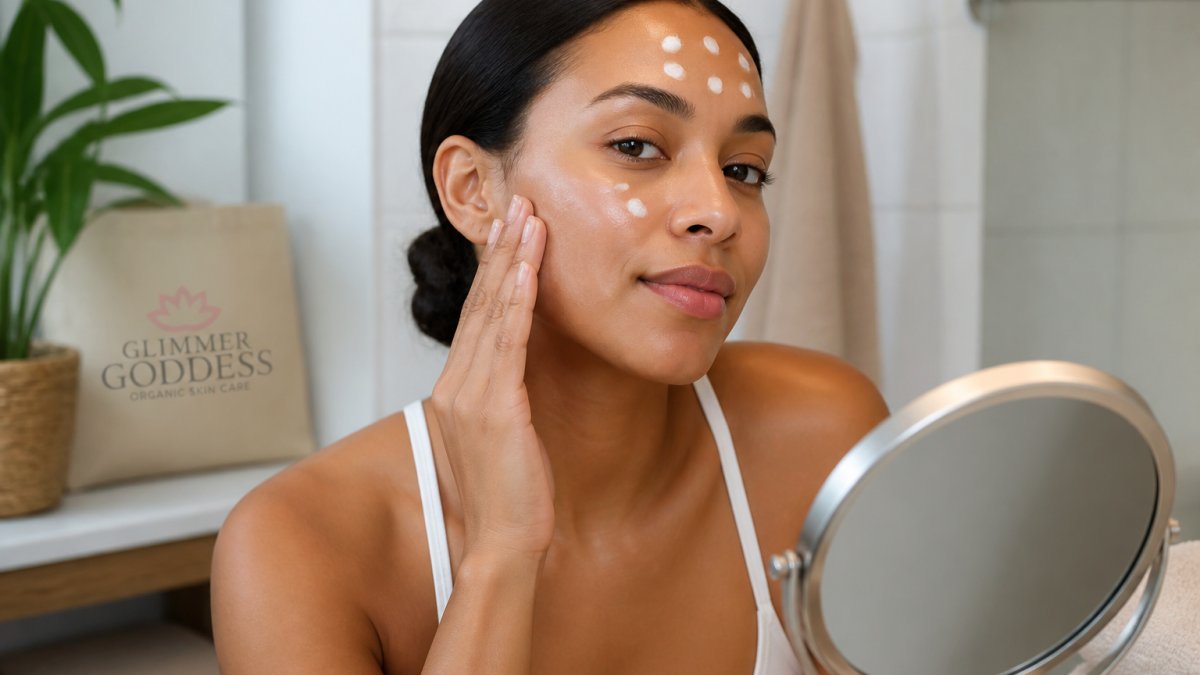
Kozon Skincare's application guide recommends placing small dots on the forehead, cheeks, nose, chin, and neck, then blending each dot on its own. Working section by section beats smearing one big blob across the whole face.
Pat first, then blend. Patting presses the product into the skin. Rubbing too hard pushes pigment into fine lines and leaves streaks. Divide the measured amount across those dots so no single spot gets a heavy load, that is the practical fix for the coverage-versus-cast tradeoff.
Step 4: Build in Thin Layers, Not One Thick Coat
If the full amount feels heavy in one pass, split it into two thin layers. Apply the first layer, let it set for about a minute, then apply the second. Two light passes beat one heavy one every time, and layering keeps the film even while reducing the chance of visible buildup around the nose and hairline. This methodical approach to application mirrors the patience required when layering skincare products to ensure that each active ingredient absorbs fully without disrupting the protective barrier.
Step 5: Let It Settle Before Makeup
Give the sunscreen one to two minutes to set before foundation. Colorescience's guide to white cast advises waiting that long so makeup layers on top instead of dragging the formula around.
Warm the product between your fingers first if it feels thick. A little warmth makes blending easier.
How Technique Shifts by Skin Tone and Formula
The same routine works for everyone, but the emphasis changes. On deeper skin tones, cast reads as ashiness, so thin layers and patting matter more than speed. On lighter skin tones, streaks and patchiness at the hairline are the usual complaint, so feathering edges with a damp sponge helps most. With tinted formulas, blend slightly past the jawline so the tint fades naturally into the neck. With untinted formulas, a damp sponge finish presses out residue without removing product.
How Much Sunscreen to Apply for Even Coverage
Most people apply far less sunscreen than they should, and under-application creates its own problems. Too little product means uneven coverage, which reads as patchy residue rather than a smooth finish.
Aim for a generous, even layer across the face and neck. Mádara's tinted mineral sunscreen guide suggests roughly ¼ teaspoon for the face as a working reference.
Spread that amount in thin layers rather than one thick coat. Two light passes beat one heavy one every time.
| Application Problem | Likely Cause | Fix |
|---|---|---|
| Chalky patches | Too much product in one spot | Dot and blend section by section |
| Streaks | Rubbing instead of patting | Pat, then blend lightly |
| Pilling | Silicone primer underneath | Skip the primer or switch formulas |
| Visible edges at hairline | Product pushed into hair | Blend with a damp sponge |
| Uneven tone | Skipped the neck | Apply to face, ears, and neck |
Tinted Mineral Sunscreen: When a Hint of Color Helps
Tinted mineral sunscreen uses iron oxides to add color, and that color cancels out the white residue.
Mádara's guide to tinted mineral formulas presents tinted options as a direct answer to visible white cast, and that matches what most users find in practice.
The tradeoff is shade matching. A tint that is too light or too warm looks worse than the cast it was meant to hide.
Organic Reef-Safe Sunscreen – Broad Spectrum SPF 40 →
Tinted formulas also work well as a makeup base. They even out tone and cut a step from the morning routine.
Mineral Sunscreen for Dark Skin: Reducing Ashiness
On deeper skin tones, white cast reads as ashiness, a grayish film that flattens the complexion. It is the most common complaint about mineral formulas, and it is fair. The reason is simple physics: zinc oxide and titanium dioxide are white powders, and a white film over deeper skin shifts the visible tone toward gray. The fix is not one trick, it is matching formula, particle size, and technique to your skin.
Why Cast Varies by Skin Tone
The same formula can look nearly invisible on light skin and obviously ashy on deep skin, because the contrast between the white film and your natural tone is larger. That means deeper skin tones benefit most from formulas designed to disappear: tinted versions, finer particle dispersions, and lighter textures. Lighter skin tones can often get away with untinted formulas applied well.
Filter Type and Particle Size
Both zinc oxide and titanium dioxide can leave residue, but they behave differently. Titanium dioxide tends to be more opaque and can look chalkier at higher loads. Zinc oxide can be formulated to disperse more transparently, especially when micronized. Look for micronized or non-nano zinc oxide, which disperses more transparently than larger particles. Note the tradeoff: very fine particles spread more invisibly but can be trickier to layer evenly, so thin layers and patting matter more.
Tinted Versus Untinted
Tinted mineral sunscreens use iron oxides to add color, and that color cancels out the white residue. For many people with deeper skin, a tinted formula is the simplest fix available. The catch is shade matching: a tint that is too light or too warm looks worse than the cast it was meant to hide. Test on the jawline in natural light before committing, and blend slightly past the jaw so the tint fades into the neck.
Technique Adjustments That Matter Most
- Apply to damp, moisturized skin
- Measure the full amount first, then use thin layers instead of one thick coat
- Pat rather than rub
- Finish with a damp sponge to press out residue
- Choose a tinted version when shade match allows
- Feather edges at the hairline and jaw so residue does not collect in one line
Glimmer Goddess offers a mineral face moisturizer with SPF 30 that blends in with minimal visible white cast when applied as directed, which makes it a practical starting point for daily wear.

Troubleshooting Pilling, Streaks, and Coverage Gaps
Pilling is the small rolled-up balls of product that appear when layers don't agree with each other.
Common culprits:
- Silicone-heavy primers
- Thick serums applied right before sunscreen
- Rubbing the sunscreen in before the skincare has absorbed
The fix is simple. Wait 60 seconds between each layer and use fewer products underneath.
Streaks along the jaw and hairline come from blending in one direction and stopping.
Coverage gaps show up around the nose, ears, and hairline. Those spots get missed because they are awkward to reach.
Facial hair needs its own approach. Work the sunscreen into the beard or brow line with fingertips, moving against the grain, then smooth back down.
Choosing a Mineral Sunscreen With Less Visible Residue
Formula shopping is where a lot of people give up.
Look for these signals:
- Non-nano or micronized zinc oxide
- A tinted version for deeper skin tones
- A lightweight lotion texture rather than a thick cream
- Water-resistant claims if you will be sweating
Glimmer Goddess makes its Organic Reef-Safe Sunscreen SPF 40 with uncoated non-nano zinc oxide and a lightweight texture that dries down without a greasy feel.
For a glow finish, the Goddess Glow Shimmer Suntan Lotion SPF 40 adds light-catching mica, which visually softens any residue while providing broad-spectrum protection.

Texture is the tell.
White cast is a technique problem more often than a product problem, and that is good news.
For anyone building a simpler morning routine, Glimmer Goddess offers mineral SPF options made with certified organic ingredients, including a daily moisturizer with SPF 30 and a reef-safe SPF 40 sunscreen, both vegan and cruelty-free. Start with the personalized skincare routine quiz to find the formula that fits your skin, then apply it with the steps above.
Frequently Asked Questions
How do I apply mineral sunscreen so it doesn't look chalky?
Prep skin with a moisturizer first, then dot on small amounts across the forehead, cheeks, nose, chin, and neck and blend each dot individually rather than rubbing one large blob over your whole face. Patting instead of rubbing helps the zinc oxide sit more evenly. Let it settle for one to two minutes before makeup. A tinted mineral sunscreen can also cut visible residue when you want a more uniform finish.
How much sunscreen to apply to the face and neck?
Aim for roughly a quarter teaspoon for the face and a similar amount for the neck, which adds up to about a full teaspoon for face and neck together. Most people under-apply, which is why they end up with patchy protection. Apply in thin layers, adding a second pass over the nose, ears, and hairline. Reapply every two hours during sun exposure, and after sweating or swimming.
Does tinted mineral sunscreen really help reduce white cast?
Yes, for many people. The iron oxides that give tinted mineral sunscreen its color help offset the pale, chalky look zinc oxide and titanium dioxide can leave behind, especially on deeper skin tones. Tinted formulas can also help blur uneven-looking tone. If you prefer no color, look for a lightweight, non-nano zinc oxide formula and apply it in thin, patted layers instead.
What should I do if my sunscreen pills or streaks under makeup?
Pilling usually comes from layering too much product too fast or mixing formulas that don't sit well together. Give each layer, moisturizer, sunscreen, primer, time to absorb. Apply sunscreen in thin layers and pat rather than rub. Let it settle one to two minutes before foundation. If streaks appear, use a damp sponge to press the product into the skin instead of sweeping over it.